This article is an update of the article Making a topographic map with QGis which dates from version 2.18 .
The SRTM project now provides worldwide coverage of terrain elevation data. It’s now very easy to make your own topographic maps with QGis.
Here we look at:
-how to download elevation data for the area we’re interested in
-how to format the display style to match topographic map standards
-how to enhance visualization with a “shading” layer
-and finally, how to generate contours.
Download elevation data
To download elevation data for your area of interest, go to
http://viewfinderpanoramas.org/dem3.html
This video shows you how to download the data.
The data available corresponds
- At a definition of 3″ of arc, about 75m. Each pixel of your DTM will therefore be this size. For the DTM and corresponding map to be correct, you need to work with an area around fifteen kilometers wide.
- At a definition of 1″ of arc, that’s about 25m. Each pixel of your DTM will therefore be this size. For the DTM and corresponding map to be correct, you need to work with an area around five kilometers wide.
- For smaller areas, pixelation becomes visible and the quality of the topographic map suffers.
Downloaded tiles are one degree by one degree in size and in hgt format.
This format is directly readable by QGis. You can therefore load the tiles using the add raster feature in the map window.

Set display style
By default, the raster is displayed in shades of gray. It is therefore necessary to apply a suitable color ramp to accentuate the topography.
The color ramps contained in the default styles are not ideal for topographic maps. Click on the Style Manager tool to open the Style Manager window.

Not all color ramps are installed automatically. The one we’re particularly interested in, cpt-city, has to be installed manually.

- Click on the Add Object button
- Choose Catalogue cpt-city from the drop-down menu.
- Click on Topography.
- Select the sd-a palette
- Check the box Save as standard palette

When you click OK, you’ll have the choice of adding the palette to the project styles or to the default palettes. If you plan to use the palette in other projects, choose the second option. Give your palette a name.

You will then see it in the list of available palettes when you go to Layer properties -> Rendering type: Single-band pseudo-color->Color palette.

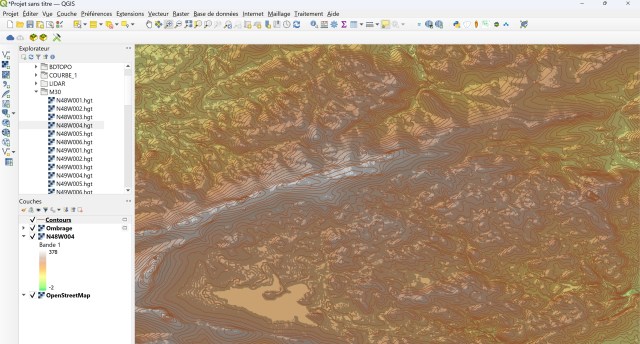
And you get the following result

Add a hillshade layer
To create this layer, simply go to Raster -> Terrain analysis -> Hillshade. You can also define a project-wide hillshade by going to Project-> Properties–> Terrain and checking the Global Map shading box. But the Shading option gives you a little more freedom to adapt shading to your objectives.

The result appears as a new layer

All that remains is to modify the style of this layer to give you a topographical view.
Open Shading layer properties->Symbology

- Cambie el valor mínimo a 125 y el máximo a 255.
- Cambiar el Modo de fusión a Multiplicar
- Cambiar el Brillo a 45
- Cambiar el Contraste a 20
Click on the Transparency tab and in Global Opacity enter the value 40.
The final result is as follows:

Generate contours (contour lines)
If you want to add contours, simply go to Raster-> Extraction -> Contour… in the menu.

- Select DTM as input layer
- Enter the interval, in meters, between the various contours
- Enter an Attribute Name if you wish to have elevation as an attribute field for contours (if not, you won’t be able to label contours)

Once the command has been executed, the contours will be loaded:
One final comment:

The symbol to the right of the Shading and Contours layers indicates that these are layers in memory. To make sure you don’t have to redo all this work, save them as a permanent file (Layer->Export->Save as…).
The next logical step is to create topographic profiles. You’ll find a tutorial in the article How to make a topographic profile with QGis 3.26.